# Emails

<div class="sticky-spacer" id="bkmrk-"><div class="sticky-wrapper is-sticky" id="bkmrk--1"><div id="bkmrk--2"></div></div></div><div id="bkmrk--3"><div id="bkmrk--4"></div></div>## Mail Accounts Overview

Configuring email for **KiyoCRM** provides a wide range of features, including sending personal emails to contacts, automatic creation of cases, sending notifications for events using Workflows and sending email marketing Campaigns.

This document explains the different types of mail accounts and how to set them up. For information on reading and sending email in **KiyoCRM** using the Emails module, see the Email Module guide.

Several different types of account can be configured within **KiyoCRM** for different purposes. These are:

**Outgoing Mail**

The outgoing mail server is used to send automatic email notifications (such as record assignment notifications) and emails sent as workflows actions.

The outgoing mail configuration will need to be set up by an Administrator.

See <span style="color: rgb(53, 152, 219);">Outgoing Mail Configuration</span> for instructions on setting up the default outgoing mail configuration.

Other outbound accounts can be configured in addition to the default account for specific purposes, such as sending Campaigns. These can be set up from the admin panel, under outbound accounts. If no other outbound accounts are configured, the default outgoing mail server account will be used.

**Personal Accounts**

A personal account is used to view and send email from a personal email account within the Emails module. This account can be an internal or an external email account. Emails from personal accounts are not stored in **KiyoCRM** unless manually imported.

Personal accounts can be configured by the user from their user profile. Administrators can configure personal accounts for other users.

See <span style="color: rgb(53, 152, 219);">Managing User Accounts</span> for instructions on setting up a personal account.

**Group Accounts**

Group accounts are used when you need several users to be able to view and send email from one mail account, for example a support or sales mailbox. Group accounts can be set up to automatically import emails and create <span style="color: rgb(53, 152, 219);">Cases</span> from incoming email.

Group accounts must be set up by an Administrator. Access to a group account must be granted by an Administrator.

Set up a group account from the <span style="color: rgb(53, 152, 219);">Inbound Email </span>page.

**Bounce Handling Accounts**

A Bounce Handling account is used with <span style="color: rgb(53, 152, 219);">Campaigns </span>to handle bounced mail notifications when emails are undelivered. You will need to set up a Bounce Handling account in order to send a Campaign.

Bounce Handling accounts must be set up by an Administrator. Once set up, users can select the bounce handling account when setting up a campaign.

Set up a Bounce Handling account from the <span style="color: rgb(53, 152, 219);">Inbound Email</span> page.

### Email Settings

#### Outgoing Mail Configuration

The outgoing mail configuration settings are used to send system notification emails such as password reset emails, record assignment notifications and workflow email notifications.

[![image.png](https://docs.kiyocrm.com/uploads/images/gallery/2025-05/scaled-1680-/lfMimage.png)](https://docs.kiyocrm.com/uploads/images/gallery/2025-05/lfMimage.png)

[![image.png](https://docs.kiyocrm.com/uploads/images/gallery/2025-05/scaled-1680-/7DKimage.png)](https://docs.kiyocrm.com/uploads/images/gallery/2025-05/7DKimage.png)

[![image.png](https://docs.kiyocrm.com/uploads/images/gallery/2025-05/scaled-1680-/NzAimage.png)](https://docs.kiyocrm.com/uploads/images/gallery/2025-05/NzAimage.png)

Select the mail provider by clicking the appropriate button and then enter the required configuration information for your system. Verify that any default port/protocol settings are valid for your setup.

<div id="bkmrk-allow-users-to-use-t"><div class="sect1"><div class="sectionbody"><div class="sect2"><div class="paragraph">  
</div><table class="tableblock frame-none grid-none stretch"><colgroup><col></col><col></col></colgroup><tbody><tr><td class="tableblock halign-left valign-top">**Allow users to use this account for outgoing mail**

</td><td class="tableblock halign-left valign-top">When this option selected, all users will be able to send emails using this outgoing mail account, which is the same as that used to send system notifications and alerts. If the option is not selected, users can still use the outgoing mail server after providing their own account information.

</td></tr><tr><td class="tableblock halign-left valign-top">**Users may send as themselves**

</td><td class="tableblock halign-left valign-top">When this option selected, all users will be able to send emails using the same outgoing mail account used to send system notifications and alerts. If the option is not selected, users can still use the outgoing mail server after providing their own account information.

</td></tr></tbody></table>

<div class="paragraph">  
</div></div></div></div></div>Click **Send Test Email** to check your settings. You will be asked to enter an email address for the test message to be sent to.

[![image.png](https://docs.kiyocrm.com/uploads/images/gallery/2025-05/scaled-1680-/dkkimage.png)](https://docs.kiyocrm.com/uploads/images/gallery/2025-05/dkkimage.png)

A verification message will be displayed if the email was sent successfully. Check that you have received this test message.

Once the settings have been verified, click **Save** to that these settings are retained before leaving the settings page.

#### Troubleshooting

If the test message was not sent successfully, check the log file for any further error messages which may assist with resolving the issue.

Verify that all port/protocol settings are correct and that the username/password entered is correct and has the correct permissions to send mail.

### Email Options

[![image.png](https://docs.kiyocrm.com/uploads/images/gallery/2025-05/scaled-1680-/ruqimage.png)](https://docs.kiyocrm.com/uploads/images/gallery/2025-05/ruqimage.png)

<div id="bkmrk-assignment-notificat"><div class="sect1"><div class="sectionbody"><div class="sect2"><div class="paragraph">  
</div><table class="tableblock frame-none grid-none stretch"><colgroup><col></col><col></col></colgroup><tbody><tr><td class="tableblock halign-left valign-top">**Assignment Notifications**

</td><td class="tableblock halign-left valign-top">When selected, users will be emailed when a record is assigned to them.

</td></tr><tr><td class="tableblock halign-left valign-top">**Send notification from the email address of the assigning user**

</td><td class="tableblock halign-left valign-top">When enabled, the assigning user’s name and email address will be included in the From field of the email. This feature might not work with SMTP servers that do not allow sending from a different email account than the server account.

</td></tr></tbody></table>

<div class="sect3">  
</div></div></div></div></div>#### OptInSettings

**KiyoCRM 7.10** introduces a new **Confirmed opt In** feature which provides two opt in settings for email addresses: **Opt In** and **Confirmed opt In**.

See the Confirmed Opt in documentation for further information on these settings.

### Email Security Settings

[![image.png](https://docs.kiyocrm.com/uploads/images/gallery/2025-05/scaled-1680-/Vkpimage.png)](https://docs.kiyocrm.com/uploads/images/gallery/2025-05/Vkpimage.png)

<div id="bkmrk-email-security-setti-1"><div class="sect1"><div class="sectionbody"><div class="sect2"><div class="sect3"><div class="paragraph">  
</div><table class="tableblock frame-none grid-none stretch"><colgroup><col></col><col></col></colgroup><tbody><tr><td class="tableblock halign-left valign-top">**Email Security Settings**

</td><td class="tableblock halign-left valign-top">Tags selected here will be stripped from inbound email and will not be displayed in the **Emails** module.

</td></tr></tbody></table>

<div class="paragraph">  
</div></div></div></div></div></div>Click **Save** retain your settings.

### Inbound Email

Set up group mail accounts for monitoring inbound email and bounce handling accounts for campaigns by visiting your profile. You can also manage personal inbound mail account information for users from this panel.

[![image.png](https://docs.kiyocrm.com/uploads/images/gallery/2025-05/scaled-1680-/oKIimage.png)](https://docs.kiyocrm.com/uploads/images/gallery/2025-05/oKIimage.png)

#### Personal Email Account

A personal email account is an internal or external email account used to view and send personal emails from the Emails Module.

#### Group Email Account

A group email account allows more than one user to access a particular mail account. This can be useful for sales or support email accounts for example. In addition, group accounts are also used for sending email campaigns. See the **Campaigns** documentation for more information.

**KiyoCRM** can also be configured to automatically import emails and to automatically create cases from email.

#### Inbound Email Settings

The mail protocol supported by **KiyoCRM** is IMAP.

#### Basic Auth

<span class="image">[![Group Mail Settings](https://docs.suitecrm.com/images/en/admin/EmailServerConfiguration.png)](https://docs.suitecrm.com/images/en/admin/EmailServerConfiguration.png)</span>

When setting up with `Basic Auth` all you will need is the username(email) and password of the account you are adding as well as the mail server address.

**Monitored Folders** are the folders which are checked for new (unread) mail. **Inbox** and **Trash** folder names must be specified here. Click **Select** to connect to the mail server and select the relevant folder(s) from the popup dialog.

#### OAuth Configuration

[![image.png](https://docs.kiyocrm.com/uploads/images/gallery/2025-05/scaled-1680-/qMSimage.png)](https://docs.kiyocrm.com/uploads/images/gallery/2025-05/qMSimage.png)

When setting up with OAuth, you will need the username(email), password and mail server address for the account.

The other required field is `External OAuth Connection`, you can see how to configure this How to Configure <span style="color: rgb(53, 152, 219);">Inbound Email with OAuth.</span>

#### Email Handling Options

[![image.png](https://docs.kiyocrm.com/uploads/images/gallery/2025-05/scaled-1680-/tRNimage.png)](https://docs.kiyocrm.com/uploads/images/gallery/2025-05/tRNimage.png)

#### Import Emails Automatically

Check this box to import emails automatically, which means that records will be created in **KiyoCRM** for all incoming emails. These associated emails can then be viewed via the History subpanel of the relevant record. This setting is selected by default in **KiyoCRM**.

##### Create Case from Email

Check this box to set up **KiyoCRM** to create a <span style="color: rgb(53, 152, 219);">Case</span> record from an incoming email.

[![image.png](https://docs.kiyocrm.com/uploads/images/gallery/2025-05/scaled-1680-/Jmkimage.png)](https://docs.kiyocrm.com/uploads/images/gallery/2025-05/Jmkimage.png)

Select a **Distribution Method** to specify how cases created from incoming email are assigned to users.

<div id="bkmrk-system-default-this-"><div class="sect1"><div class="sectionbody"><div class="sect2"><div class="sect3"><div class="paragraph">  
</div><table class="tableblock frame-all grid-all stretch" style="width: 100%;"><colgroup><col style="width: 11.7939%;"></col><col style="width: 88.1823%;"></col></colgroup><tbody><tr><td class="tableblock halign-left valign-top">**System default**

</td><td class="tableblock halign-left valign-top">This will use the default settings, configurable via the admin panel.

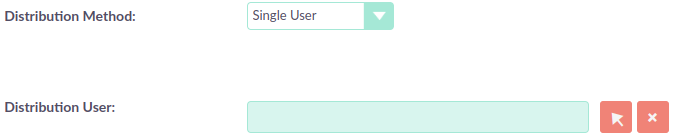
</td></tr><tr><td class="tableblock halign-left valign-top">**Single User**

</td><td class="tableblock halign-left valign-top">Enter a username or click the select arrow to search for a user. Every automatically created case will be assigned to the specified user.<span class="image">[![Single User](https://docs.suitecrm.com/images/en/admin/EmailDistrubutionSU.png)](https://docs.suitecrm.com/images/en/admin/EmailDistrubutionSU.png)</span>

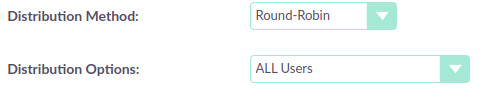
</td></tr><tr><td class="tableblock halign-left valign-top">**Round Robin**

</td><td class="tableblock halign-left valign-top">Select All Users or an existing security group or role. Cases will be assigned to the next member of the specified group or role.<span class="image">[![Round Robin](https://docs.suitecrm.com/images/en/admin/EmailDistributionRR.png)](https://docs.suitecrm.com/images/en/admin/EmailDistributionRR.png)</span>

</td></tr><tr><td class="tableblock halign-left valign-top">**Least Busy**

</td><td class="tableblock halign-left valign-top">Select All Users or an existing security group or role. Cases will be assigned to the member of the specified group or role with the least case assignments.

</td></tr><tr><td class="tableblock halign-left valign-top">**Random**

</td><td class="tableblock halign-left valign-top">Select All Users or an existing security group or role. Cases will be assigned randomly to members of the specified group or role.

</td></tr></tbody></table>

<div class="paragraph">  
</div></div></div></div></div></div>**Auto-Reply configuration**

If **KiyoCRM** has been configured to auto-create cases, you can select or create an email template to use as an automated response to notify the sender that a case has been created. If no template is specified here, this automated response will not be sent.<span class="image">[![New Case Auto-Reply template](https://docs.suitecrm.com/images/en/admin/EmailAutoReplyConfiguration.png)](https://docs.suitecrm.com/images/en/admin/EmailAutoReplyConfiguration.png)</span>

<div id="bkmrk-no-auto_reply-to-thi"><div class="sect1"><div class="sectionbody"><div class="sect2"><div class="sect3"><div class="paragraph">  
</div><table class="tableblock frame-none grid-none stretch"><colgroup><col></col><col></col></colgroup><tbody><tr><td class="tableblock halign-left valign-top">**No Auto\_Reply to this Domain**

</td><td class="tableblock halign-left valign-top">No auto-responses will be sent to the specified domain. Use this for example to exclude your company domain, so your users do not receive auto-reply messages.

</td></tr><tr><td class="tableblock halign-left valign-top">**Number of Auto-responses**

</td><td class="tableblock halign-left valign-top">This setting specifies the maximum number of replies to send to a particular email address in a 24hr period.

</td></tr></tbody></table>

</div><div class="sect3">  
</div></div></div></div></div>#### Outbound Configuration

<span class="image">[![Group Mail Reply To settings](https://docs.suitecrm.com/images/en/admin/InboundOutboundConfiguration.png)](https://docs.suitecrm.com/images/en/admin/InboundOutboundConfiguration.png)</span>

<div id="bkmrk-from-address%3A-used-a"><div class="sect1"><div class="sectionbody"><div class="sect2"><div class="sect3"><div class="paragraph">  
</div><table class="tableblock frame-none grid-none stretch"><colgroup><col></col><col></col></colgroup><tbody><tr><td class="tableblock halign-left valign-top">**From Address:**

</td><td class="tableblock halign-left valign-top">Used as the from address where supported, otherwise the [system outbound](https://docs.suitecrm.com/admin/administration-panel/emails/email/#_outgoing_mail_configuration) account will be used.

</td></tr><tr><td class="tableblock halign-left valign-top">**Allow users to send emails using the From name and Address as the reply to address:**

</td><td class="tableblock halign-left valign-top">When checked, the **From Name** and **From Address** for this account will appear as a **From** option when composing an email for all users that have access to this group account.

</td></tr></tbody></table>

<div class="paragraph">  
</div></div></div></div></div></div>Once configured, all inbound accounts are listed under **Inbound Accounts** on the **Admin** panel, from where they can be edited or removed.

#### Bounce Handling Account

A Bounce Handling Account is used to manage bounce notifications for an email [campaign](https://docs.suitecrm.com/user/core-modules/campaigns/). Bounced email addresses are recorded in the campaign status.

Once created, the bounce handling account can be selected by users when setting up a campaign.

Select **New Bounce Handling Account** from the Sidebar.

[![image.png](https://docs.kiyocrm.com/uploads/images/gallery/2025-05/scaled-1680-/SIIimage.png)](https://docs.kiyocrm.com/uploads/images/gallery/2025-05/SIIimage.png)

Enter the configuration details for the bounce account you are configuring. You will need the username and password for the account, plus the mail server address. Your system administrator will be able to supply these settings.

The mail protocol supported by **KiyoCRM** is IMAP.

[![image.png](https://docs.kiyocrm.com/uploads/images/gallery/2025-05/scaled-1680-/2zjimage.png)](https://docs.kiyocrm.com/uploads/images/gallery/2025-05/2zjimage.png)

**Monitored Folders** are the folders which are checked for new (unread) mail. **Inbox** and **Trash** folder names must be specified here.

Click **Select** to connect to the mail server and select the relevant folder(s) from the popup dialog.

### Outbound Email

Set up system outbound mail accounts for monitoring outbound email. You can also manage personal outbound mail account information for users from this panel.

### System Email Account

System email allows users inside your business to send emails to recipients outside of the associated domains for your business. This can be useful because it means users can email customers and give them support.

When you install KiyoCRM, an account for system outbound email will be automatically created but you can create your own account with different configurations.

Select **New System Outbound Email Account** from the sidebar

[![image.png](https://docs.kiyocrm.com/uploads/images/gallery/2025-05/scaled-1680-/ERKimage.png)](https://docs.kiyocrm.com/uploads/images/gallery/2025-05/ERKimage.png)

You will need the username for the account you are adding, plus the mail server address, the port number of the account. You can also check if you want to use SMTP authentication. If you do, you will need the password of the account you are adding. The mail protocols supported by KiyoCRM is SMTP and SSL.

[![image.png](https://docs.kiyocrm.com/uploads/images/gallery/2025-05/scaled-1680-/liNimage.png)](https://docs.kiyocrm.com/uploads/images/gallery/2025-05/liNimage.png)

Once this account has been created, click **Send Test Email** and a popup will appear to enter the address of the email address that a test notification will be sent to.

[![image.png](https://docs.kiyocrm.com/uploads/images/gallery/2025-05/scaled-1680-/Z0mimage.png)](https://docs.kiyocrm.com/uploads/images/gallery/2025-05/Z0mimage.png)

### Personal Outbound Email Account

Personal accounts will allow users to send emails to clients outside of associated domains of your business. When you install KiyoCRM, it is recommended an outbound account is made and this can be configured with different configurations

You will need the username for the account you are adding, plus the mail server address, the port number of the account. You can also check if you want to use SMTP authentication. If you do, you will need the password of the account you are adding. The mail protocols supported by KiyoCRM is SMTP and SSL.

[![image.png](https://docs.kiyocrm.com/uploads/images/gallery/2025-05/scaled-1680-/liNimage.png)](https://docs.kiyocrm.com/uploads/images/gallery/2025-05/liNimage.png)

Once this account has been created, click and a popup will appear to enter the address of the email address that a test notification will be sent to.

[![image.png](https://docs.kiyocrm.com/uploads/images/gallery/2025-05/scaled-1680-/tZ1image.png)](https://docs.kiyocrm.com/uploads/images/gallery/2025-05/tZ1image.png)

### Campaign Email Settings

 Configure the following additional settings for <span style="color: rgb(53, 152, 219);">Campaigns</span> here:

<div id="bkmrk-the-batch-size-for-s"><div class="sect1"><div class="sectionbody"><div class="paragraph">  
</div><div class="ulist">- The batch size for sending campaign emails
- Where campaign tracking files are located
- Whether or not copies of campaign messages are kept

</div><div class="paragraph">  
</div></div></div></div>[![image.png](https://docs.kiyocrm.com/uploads/images/gallery/2025-05/scaled-1680-/0w1image.png)](https://docs.kiyocrm.com/uploads/images/gallery/2025-05/0w1image.png)

### Email Queue

Scheduled campaign emails are queued here until the scheduled job runs to send them out. By default, this is the **Run Nightly Mass Email Campaigns** scheduled job.

See the **Scheduler** section for further information on scheduled jobs.

Click **Send Queued Emails** to send them immediately without waiting for the scheduler to do so.