# Google Credentials and Syncing

<section id="bkmrk-this-enhancement-is-">This enhancement is in **Beta** please help by providing us your feedback! It is only available in KiyoCRM versions 7.11 and newer.

## Overview 

KiyoCRM has the ability to synchronize a user’s meetings with their Google Calendar. This is a bidirectional sync, and changes on either end of the synchronization cause updates on the other.

There is no middle man in this process. Your data does not pass through any 3rd parties. It’s just your KiyoCRM instance, and Google’s servers.

### Requirements 

#### Valid API Credentials 

In order to synchronize a user’s KiyoCRM meetings with their Google Calendar, the system must have valid credentials saved.

These credentials are created on the Google Developer’s Console, downloaded as a JSON file, and imported into KiyoCRM. There are instructions on how to do this further down this page.

#### Internet Access from the KiyoCRM Server 

The KiyoCRM server must also have access to the internet. However, the KiyoCRM server does not need to be publicly accessible. The user must be able to reach both Google and KiyoCRM at the same time to authorize calendar access. Once that is done, the synchronization process runs on a schedule without any user interaction. The user does not need to be logged in to KiyoCRM for the synchronization to function.

#### At Least One Google Account 

You’ll need a Google Account to create the API credentials, and an account to synchronize with. They can be the same account if you only have one user. The API credentials only need to be generated once, from a single account. These credentials can be used to synchronize all the users once they authorize access to their account. These accounts can be generic @gmail.com accounts, or any level of GSuite accounts (Basic/Business/Enterprise).

## Generating &amp; Installing Google Credentials 

### Generating Credentials 

Make sure you’re logged into a Google account before proceeding.

Go to [Google Developers Console](https://console.developers.google.com/apis/dashboard)

<div class="padding highlightable sticky-parent"><div class="sect1"><div class="sectionbody"><div class="sect2"><div class="paragraph">  
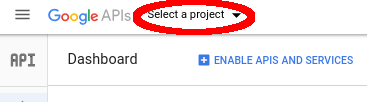
</div><table class="tableblock frame-all grid-all stretch"><colgroup><col></col><col></col></colgroup><tbody><tr><td class="tableblock halign-left valign-top">Click on the drop-down at the top of the screen.

</td><td class="tableblock halign-left valign-top"><span class="image left">[![cred 1](https://docs.suitecrm.com/images/en/googleapi/cred_1.png)](https://docs.suitecrm.com/images/en/googleapi/cred_1.png)</span>

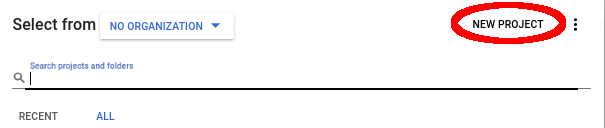
</td></tr><tr><td class="tableblock halign-left valign-top">Click on the 'New Project' Button.

</td><td class="tableblock halign-left valign-top"><span class="image left">[![cred 2](https://docs.suitecrm.com/images/en/googleapi/cred_2.png)](https://docs.suitecrm.com/images/en/googleapi/cred_2.png)</span>

</td></tr><tr><td class="tableblock halign-left valign-top">Give the project a descriptive name, like 'SuiteCRM Google Sync', and click 'Create'.

</td><td class="tableblock halign-left valign-top">[![Screenshot 3.png](https://docs.kiyocrm.com/uploads/images/gallery/2025-05/scaled-1680-/screenshot-3.png)](https://docs.kiyocrm.com/uploads/images/gallery/2025-05/screenshot-3.png)

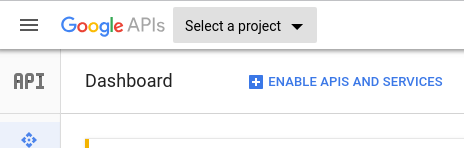
</td></tr><tr><td class="tableblock halign-left valign-top">At the top of the page, click on the 'Select a project' dropdown…​

</td><td class="tableblock halign-left valign-top"><span class="image left">[![cred 4](https://docs.suitecrm.com/images/en/googleapi/cred_4.png)](https://docs.suitecrm.com/images/en/googleapi/cred_4.png)</span>

</td></tr><tr><td class="tableblock halign-left valign-top">…​then click on the project you just created.

</td><td class="tableblock halign-left valign-top">[![Screenshot 4.png](https://docs.kiyocrm.com/uploads/images/gallery/2025-05/scaled-1680-/screenshot-4.png)](https://docs.kiyocrm.com/uploads/images/gallery/2025-05/screenshot-4.png)

</td></tr><tr><td class="tableblock halign-left valign-top">You’ll now see the project in the dropdown, and a notice that no API’s are enabled. Click on the ‘Library’ link in the notice.

</td><td class="tableblock halign-left valign-top">[![Screenshot 5.png](https://docs.kiyocrm.com/uploads/images/gallery/2025-05/scaled-1680-/screenshot-5.png)](https://docs.kiyocrm.com/uploads/images/gallery/2025-05/screenshot-5.png)

</td></tr><tr><td class="tableblock halign-left valign-top">In the search window, type in “Calendar”, then click on the ‘Google Calendar API’ result.

</td><td class="tableblock halign-left valign-top">[![Screenshot 6.png](https://docs.kiyocrm.com/uploads/images/gallery/2025-05/scaled-1680-/screenshot-6.png)](https://docs.kiyocrm.com/uploads/images/gallery/2025-05/screenshot-6.png)

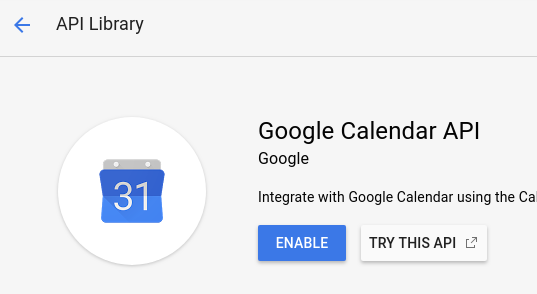
</td></tr><tr><td class="tableblock halign-left valign-top">Click the ‘Enable’ button.

</td><td class="tableblock halign-left valign-top"><span class="image left">[![cred 8](https://docs.suitecrm.com/images/en/googleapi/cred_8.png)](https://docs.suitecrm.com/images/en/googleapi/cred_8.png)</span>

</td></tr><tr><td class="tableblock halign-left valign-top">Now that we’ve enabled the API, we create the credentials. Click the ‘Create credentials’ button.

</td><td class="tableblock halign-left valign-top">[![Screenshot 7.png](https://docs.kiyocrm.com/uploads/images/gallery/2025-05/scaled-1680-/screenshot-7.png)](https://docs.kiyocrm.com/uploads/images/gallery/2025-05/screenshot-7.png)

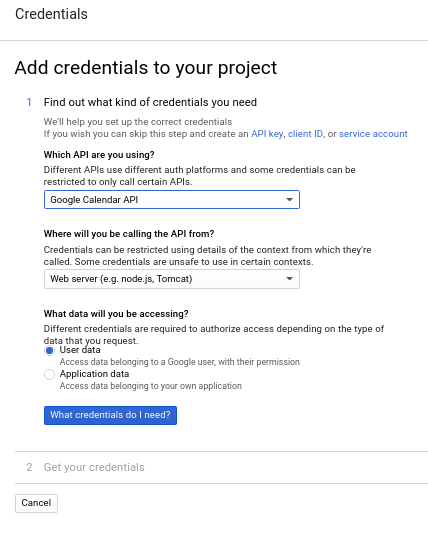
</td></tr><tr><td class="tableblock halign-left valign-top">Set the options in section 1 like this. Click on ‘What credentials do I need?’ to continue.

</td><td class="tableblock halign-left valign-top"><span class="image left">[![cred 10](https://docs.suitecrm.com/images/en/googleapi/cred_10.png)](https://docs.suitecrm.com/images/en/googleapi/cred_10.png)</span>

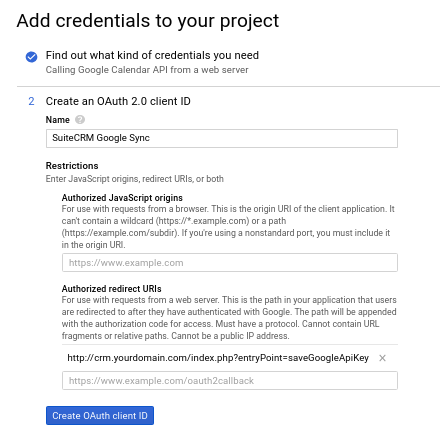
</td></tr><tr><td class="tableblock halign-left valign-top">For Section 2, give it a descriptive name. Leave ‘JavaScript origins’ blank.  
  
Under ‘Authorized redirect URIs’, you need to fill in the full URI to the ‘saveGoogleApiKey’ Entry Point.  
For example, if you reach your SuiteCRM install at the URI 'http://crm.yourdomain.com/' then you would append 'index.php?entryPoint=saveGoogleApiKey' to the end of that. The full URI would be  
`<a class="bare highlight" href="http://crm.yourdomain.com/index.php?entryPoint=saveGoogleApiKey">http://crm.yourdomain.com/index.php?entryPoint=saveGoogleApiKey</a>`  
If your SuiteCRM install is under a subdirectory, you’ll need to include that. For instance  
`<a class="bare highlight" href="http://crm.yourdomain.com/SuiteCRM/index.php?entryPoint=saveGoogleApiKey">http://crm.yourdomain.com/SuiteCRM/index.php?entryPoint=saveGoogleApiKey</a>`

Note that this does not need to be a public URL. It only needs to be accessible to the user who is enabling the calendar sync. It is strongly recommend having an https enabled site for production on a publicly accessible site.  
  
Then click on ‘Create OAuth client ID’.

</td><td class="tableblock halign-left valign-top"><span class="image left">[![cred 11](https://docs.suitecrm.com/images/en/googleapi/cred_11.png)](https://docs.suitecrm.com/images/en/googleapi/cred_11.png)</span>

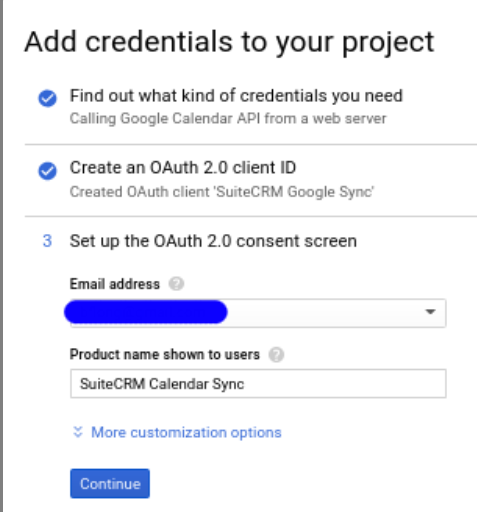
</td></tr><tr><td class="tableblock halign-left valign-top">Again, create a descriptive name. There are more options under ‘More customization options’, but they are unnecessary for this to function. Then click ‘Continue’.

</td><td class="tableblock halign-left valign-top"><span class="image left">[![cred 12](https://docs.suitecrm.com/images/en/googleapi/cred_12.png)](https://docs.suitecrm.com/images/en/googleapi/cred_12.png)</span>

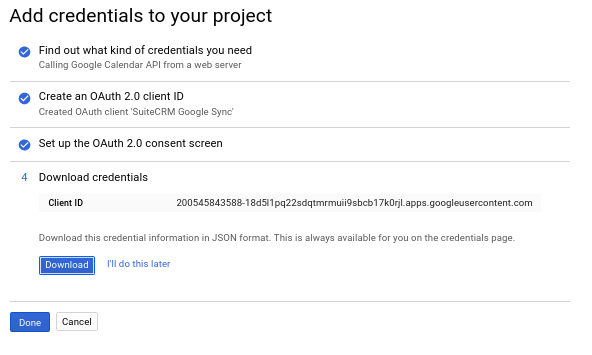
</td></tr><tr><td class="tableblock halign-left valign-top">Click on the ‘Download’ button. Save the .json file. We use this later in SuiteCRM. Click ‘Done’ when finished. This is all we need for all our users to be able to sync their calendars.

</td><td class="tableblock halign-left valign-top"><span class="image left">[![cred 13](https://docs.suitecrm.com/images/en/googleapi/cred_13.png)](https://docs.suitecrm.com/images/en/googleapi/cred_13.png)</span>

</td></tr></tbody></table>

</div><div class="sect2">  
</div></div></div></div>### [Installing Credentials ](https://docs.suitecrm.com/admin/administration-panel/google-sync/#_installing_credentials)

Log into SuiteCRM as the administrative user.

Go to ‘Administration’.  
Then scroll down to the 'Google Suite' section.  
Click on the 'Google Calendar Settings' item.

<div class="padding highlightable sticky-parent"><div><div class="sect1"><div class="sectionbody"><div class="sect2"><div class="paragraph">  
</div><table class="tableblock frame-all grid-all stretch"><colgroup><col></col><col></col></colgroup><tbody><tr><td class="tableblock halign-left valign-top">Note how it says 'Unconfigured'. This means there is no JSON file currently installed.  
Click on the 'Choose File' button here, and select the JSON file you downloaded from the Developer’s Console.  
Click the ‘Save’ button at the bottom of the screen.

</td><td class="tableblock halign-left valign-top"><span class="image left">[![cred 14](https://docs.suitecrm.com/images/en/googleapi/cred_14.png)](https://docs.suitecrm.com/images/en/googleapi/cred_14.png)</span>

</td></tr><tr><td class="tableblock halign-left valign-top">This will return you to the 'Administration' menu. Go back into 'Google Calendar Settings'.  
Now it says 'Configured' in green to show that the JSON file has been successfully saved.

</td><td class="tableblock halign-left valign-top"><span class="image left">[![cred 15](https://docs.suitecrm.com/images/en/googleapi/cred_15.png)](https://docs.suitecrm.com/images/en/googleapi/cred_15.png)</span>

</td></tr></tbody></table>

<div class="paragraph">  
</div></div></div></div></div></div>If you ever need to install new credentials, simply upload them. They will overwrite the old ones.

## Authorizing Calendar Access 

This needs to be performed by the User to enable syncing with their Google Calendar

<div class="padding highlightable sticky-parent"><div class="sect1"><div class="sectionbody"><div class="paragraph">  
</div><table class="tableblock frame-all grid-all stretch"><colgroup><col></col><col></col></colgroup><tbody><tr><td class="tableblock halign-left valign-top">Click on your name dropdown in the upper right of the KiyoCRM site, then on ‘Profile’.

</td><td class="tableblock halign-left valign-top">[![image.png](https://docs.kiyocrm.com/uploads/images/gallery/2025-05/scaled-1680-/Nrximage.png)](https://docs.kiyocrm.com/uploads/images/gallery/2025-05/Nrximage.png)

</td></tr><tr><td class="tableblock halign-left valign-top">Go to the ‘Advanced’ tab.

</td><td class="tableblock halign-left valign-top">[![image.png](https://docs.kiyocrm.com/uploads/images/gallery/2025-05/scaled-1680-/Lolimage.png)](https://docs.kiyocrm.com/uploads/images/gallery/2025-05/Lolimage.png)

</td></tr><tr><td class="tableblock halign-left valign-top">You should see the ‘Google Account Synchronization’ Subheading at the bottom. If it’s not shown, then the KiyoCRM server doesn’t have Google Credentials installed.  
Click on the ‘Authorize’ button.

</td><td class="tableblock halign-left valign-top">[![image.png](https://docs.kiyocrm.com/uploads/images/gallery/2025-05/scaled-1680-/Bfkimage.png)](https://docs.kiyocrm.com/uploads/images/gallery/2025-05/Bfkimage.png)

</td></tr><tr><td class="tableblock halign-left valign-top">If you are logged into multiple Google accounts, you’ll be asked which Google account you want to sync with. Otherwise, you’ll be taken directly to this dialog:

</td><td class="tableblock halign-left valign-top"><span class="image left">[![cred 19](https://docs.suitecrm.com/images/en/googleapi/cred_19.png)](https://docs.suitecrm.com/images/en/googleapi/cred_19.png)</span>

</td></tr><tr><td class="tableblock halign-left valign-top">Once you click on ‘Allow’, you’ll be taken back to the user profile page. Click on the ‘Advanced’ tab again, and you should see:

</td><td class="tableblock halign-left valign-top">[![image.png](https://docs.kiyocrm.com/uploads/images/gallery/2025-05/scaled-1680-/3W5image.png)](https://docs.kiyocrm.com/uploads/images/gallery/2025-05/3W5image.png)

</td></tr></tbody></table>

<div class="paragraph">  
</div></div></div></div>Check the ‘Enable Calendar Sync’ checkbox, and then click the ‘Save’ button.

That’s it! By default, the sync happens every quarter hour. That can be changed by the Administrator in the Scheduler configuration.

### Known Issues 

If the value of "google\_calendar\_sync\_name" is changed then this will cause ALL Meetings to re-sync. This is due to the fact that if the value changes, then Google detects all current meetings as new, unique Calendar items.

The best way to avoid this from happening is to not edit/change the "google\_calendar\_sync\_name" that is located in your config.php file.

## Disabling Google Calendar Sync 

If you want to disable the Google Calendar sync completely or re-add its token from scratch, perform these actions:

<div class="padding highlightable sticky-parent"><div class="sect1"><div class="sectionbody"><div class="paragraph">  
</div><table class="tableblock frame-all grid-all stretch"><colgroup><col></col><col></col></colgroup><tbody><tr><td class="tableblock halign-left valign-top">Disable the ‘Google Sync Calendars’ task(s) from Admin/Scheduler.

</td><td class="tableblock halign-left valign-top">[![image.png](https://docs.kiyocrm.com/uploads/images/gallery/2025-05/scaled-1680-/cWhimage.png)](https://docs.kiyocrm.com/uploads/images/gallery/2025-05/cWhimage.png)

</td></tr><tr><td class="tableblock halign-left valign-top">Delete the Google Cloud token line in `config_override.php`

</td><td class="tableblock halign-left valign-top"><span class="image left">[![disable 2](https://docs.suitecrm.com/images/en/googleapi/disable-2.png)](https://docs.suitecrm.com/images/en/googleapi/disable-2.png)</span>

</td></tr></tbody></table>

<div class="paragraph">  
</div></div></div></div>In order to reset Google authorization, user can reset their personal settings. It might be excessive if the token is already deleted from the admin config and the scheduler task is not active.

<div id="bkmrk-"></div></section><div id="bkmrk--1"><div>  
</div></div>