KiyoKart Documentation | POS, Billing, Inventory Guide
Get started with KiyoKart, the all-in-one SaaS platform for billing, inventory, POS, and online store management from Kiyo Solutions Pvt Ltd. Discover step-by-step guides, setup instructions, and best practices for managing products, orders, invoices, customers, and store configurations.
Configuration
Settings
After successful registration re you have to update settings according to your business like your business/shop name, logo etc.
Company Settings
This is a special setting which is only visible to user with Admin role or having permission Company Settings. You can update app related settings from this page. You can go to this page by visiting Settings → Company Settings Page
From here you can change your business details like:
- Store/Shop Name, Phone, Email, Address etc.
- Store Logo
- Time & Date Format which will be visible in your data table
- Set your App Time zone
- Your Business Currency
- Primary Color - You can change your app colors for button, form items etc.

Multi Store/Shops
If you have your business with more than one branch, then you can add it from Settings → Warehouses Page. It will generate a new store/shop with your desired settings.
- Newly created shop/store will use same Brands which already created in your app.
- Newly created shop/store will use same Categories which already created in your app.
- Newly created shop/store will use same Product which already created in your app. But it will use different sales, purchase, taxes, custom fields, wholesale price and taxes.

Taxes
You can create taxes for your store from Settings → Taxes Page. It will required following fields to create new tax:
- Name: name of tax.
- Tax Rate: Rate in percentage for the tax.
- Tax Type: Single or Multiple type.

Currencies
You can create many currencies for your store from Settings → Currencies Page according to your requirement. You can set default currency from company settings. It will required following fields to create new tax:
- Currency Name: name of currency.
- Currency Symbol: Symbol of currency.
- Position: Position of currency symbol. It will either be in front or behind after currency amount.
- Currency Code: Represent a specific currency as defined by the ISO.

Payment Modes
Modes of your payments can be created from Settings → Payment Modes. Cash Mode will be available by default, and it cannot be deletable. Other created mode is considered online mode. Which will be used for calculating Cash & Bank amount.


-
Payment Mode Name: Mention the mode as UPI or Bank
-
Bank-Specific Fields (visible when "Bank" is selected):
-
Bank Name:
-
A/C Number
-
IFSC Code
-
Branch Name
-
Bank Address (optional)
-
-
Initial Amount: Starting balance of the bank amount should be defined.
Units
Units are the used for the measurement of product. You can create units from Settings → Unit. After creating units, you can assign them to products. Following fields is required to create units:
- Unit Name: name of unit
- Short Name: short representation of unit. It will be displayed after product quantity.

Custom Fields
Custom fields are used when you want to create some extra fields for your product when creating sales and purchases. You can define default values for custom fields when you create products.

Roles & Permissions
By using roles & permissions you can control your staff members. Permissions are predefined and you can create roles according to your requirement and assign permissions to that role. Each staff member must have a role. So that staff member access to that part of application which is assigned in his Role. To create a role following below steps:
- Go to Settings → Roles & Permissions
- Create New Role and assign permission
- You can create many roles according to your requirement using permissions for e.g. Stock Manager, Cashier, Employee etc.
- Admin Role is predefined and cannot be deleted.

Email Settings
You can receive email for some activity like purchase, sales, expenses etc. To receive email first you have to setup email settings. Follow these steps to setup email settings :
- Select Mail Driver as SMTP
- From Name : name from which you want to receive email
- From Email : email from which you want to receive email
- Mail Queue : If it is selected yes it will send email in background.
- Host - host name
- Port - port number
- Encryption - it may be either tls or ssl
- Username - username of your email configuration
- Password - password of your email configuration

SMS
SMS Credits
Can buy the SMS plan and view the credits used and remaining credits in this page.

SMS Credits History
A record of all SMS credit transactions, showing usage and additions with the status.

SMS Templates
Predefined message formats used to quickly send consistent and standardized SMS communications. Can enable and disable templates based on our usage.

SMS Logs
Records of all sent SMS messages, including timestamps and delivery status. Can view the SMS Log details by clicking on the Actions icon.

Admin Panel
Dashboard
Track Sales and Purchases with pending amounts. Filter the search by using options provided at top Today, Yesterday, Last 7 Days, This Month, This Year. Customize date filter search in dashboard.

Top Selling products can be viewed using pie chart. Sales and purchases amount graph will be tracked.

Sales and purchase history count shown as a widget.

Stock Alert products list widget and Top Customers list Widget shown.
Parties
Parties are users which either sales or purchase an item/product from your store/shop. You can create a party from Parties menu from sidebar. There are two types of parties in our app:
- Customers
- Suppliers
Customers
We sales items to customers. You can create customers from Parties → Customers page. Customers are common for each warehouses/store. But Opening balance, Credit period, Credit Limit are warehouse bases

Suppliers
We purchase items from suppliers in our app. You can create customers from Parties → Suppliers page. Suppliers are common for each warehouses/store. But Opening balance, Credit period, Credit Limit are warehouse bases.

The following fields are used when we create new party:
- Profile Image
- Name of party
- Email of party
- Opening Balance - it party have some pending amount then you can enter that amount.
- Opening Balance Type - it can be pay or receive. If you want to receive amount, then it will be received.
- Credit Period - time for which you want to give credit
- Credit Limit - amount for which you want to give credit
Opening balance, Credit period, Credit Limit are warehouse bases. So, update it according to new warehouse/store.
Product Manager
You can create brands, categories and products from Product Manager menu. All these are common for every warehouses/stores. But for products opening stock, purchase price, sales price tax, custom fields, wholesale price are different for each warehouse/store.
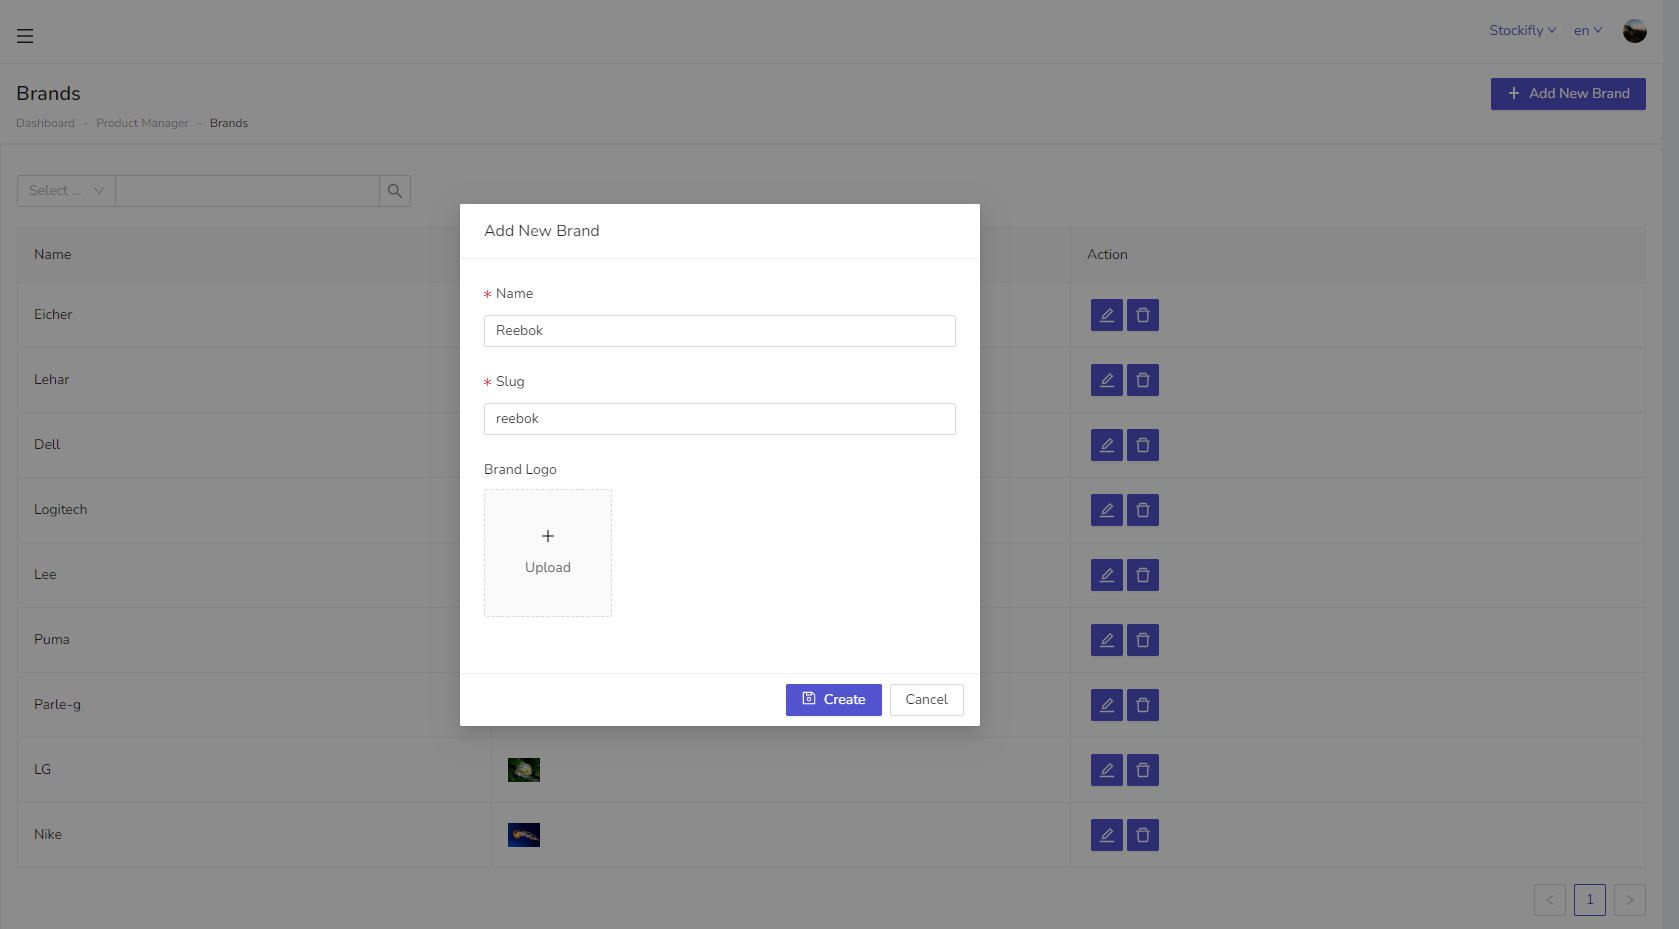
Slug are used in the query parameter. So, leave it same as auto generated until you don't know about it.
Brands
Brands are common for all warehouses/stores. You can create brands from Product Manager → Brands menu.
Categories
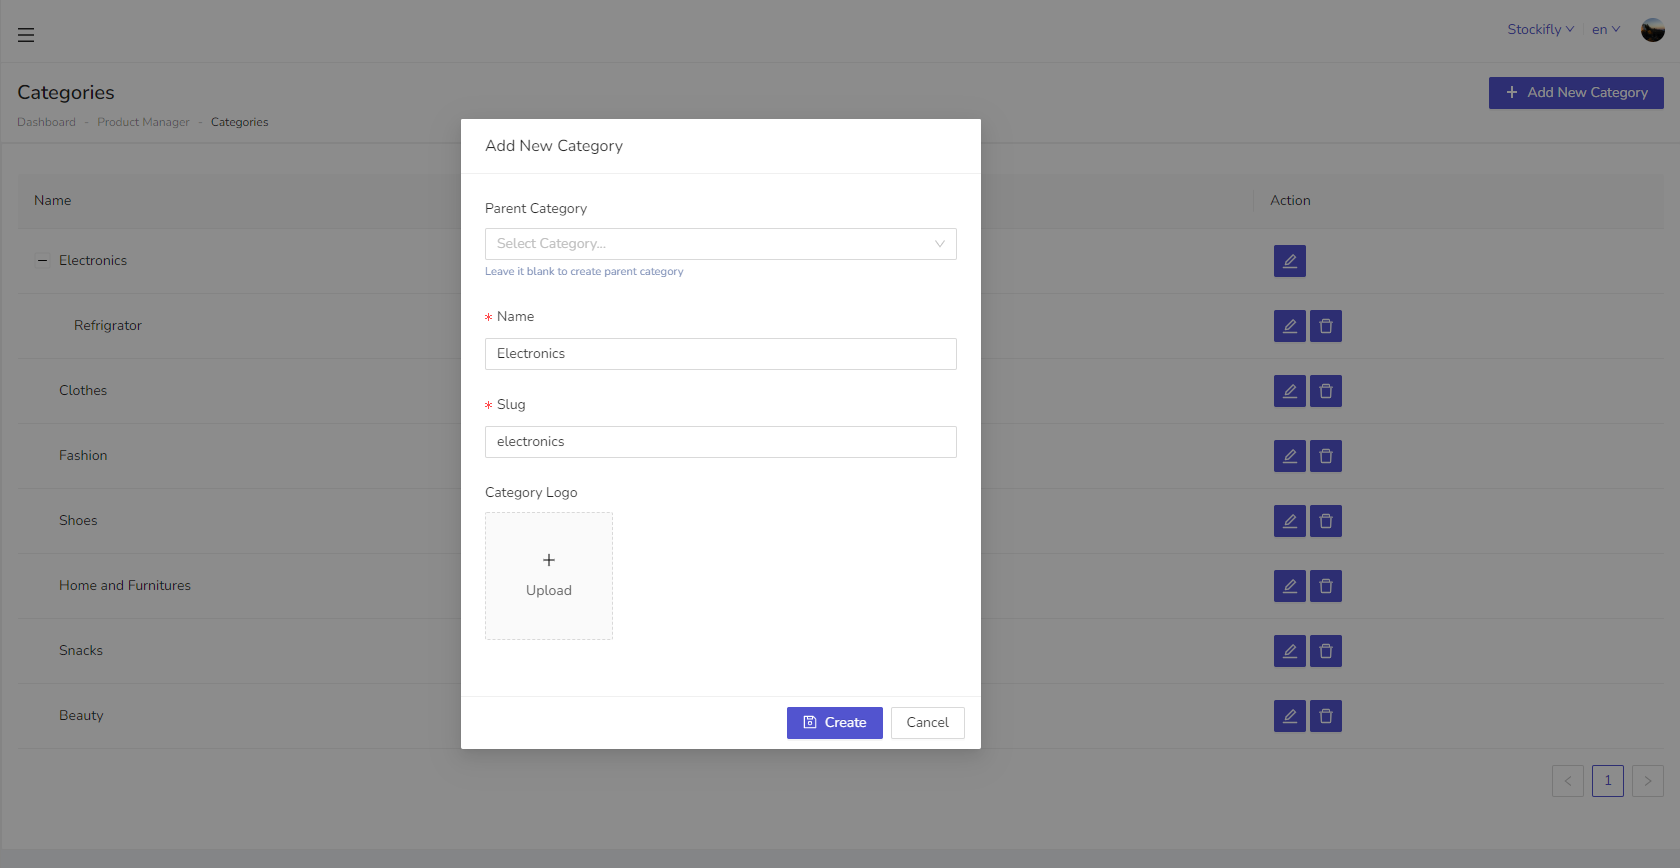
Categories are also common for all warehouses/stores. You can create brands from Product Manager → Categories menu.
- If you want to create root category, then parent category will be empty.
- If you want to create a subcategory then select parent category from dropdown in which you want to assign that subcategory.
Products
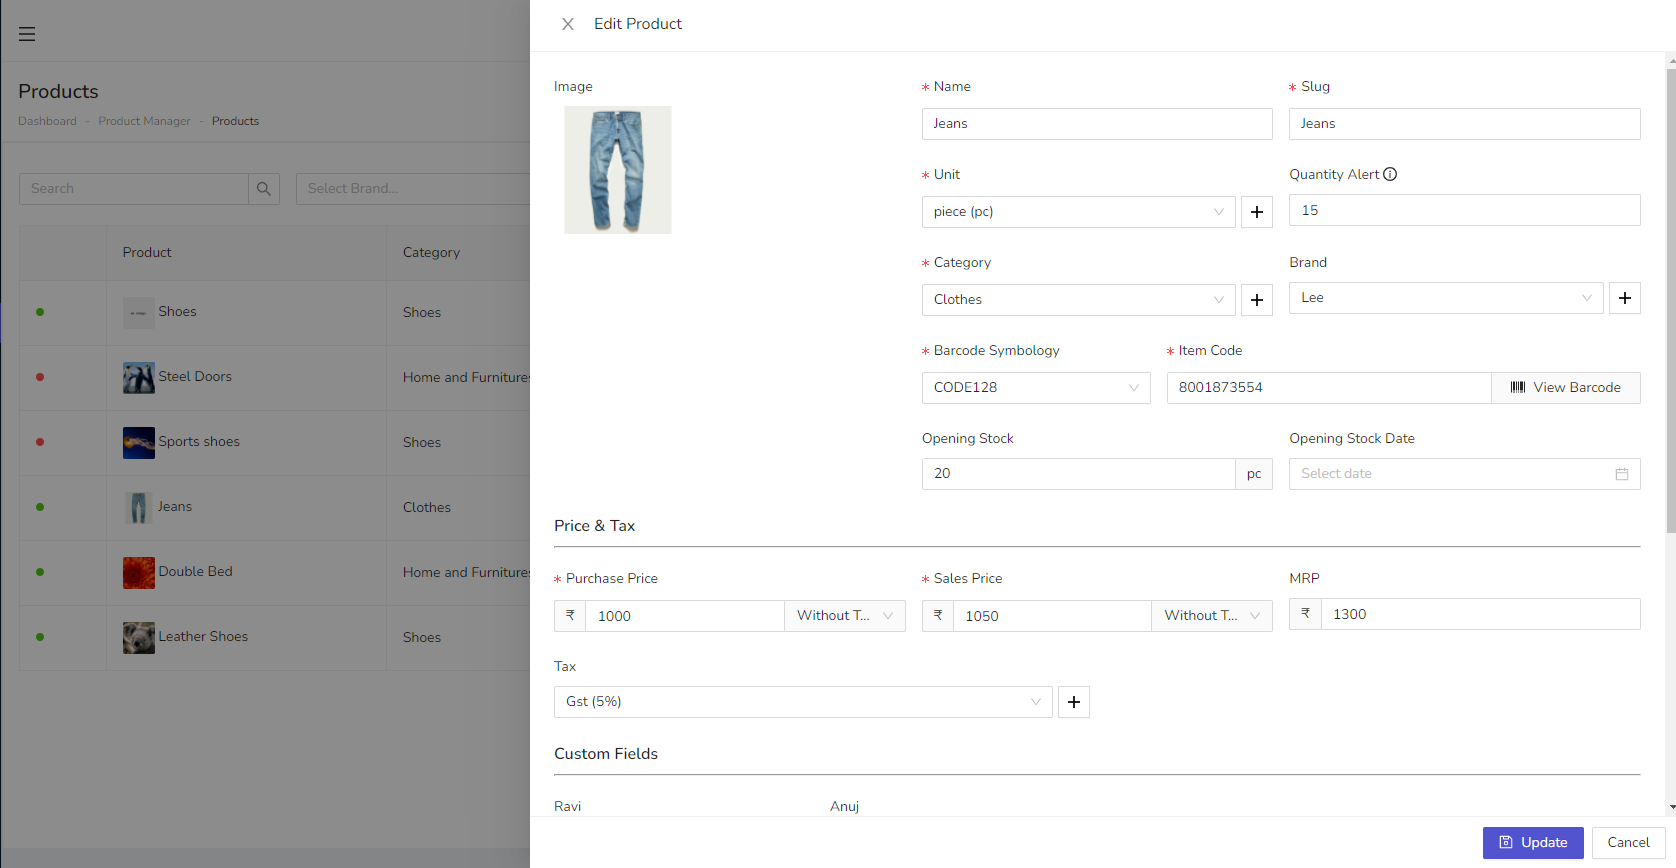
Products are also common for all warehouses/stores. You can create brands from Product Manager → Products menu. opening stock, purchase price, sales price tax, custom fields, wholesale price are different for each warehouse/store. These are fields which are used in creating products:
- Barcode Symbology
- Item Code - barcode id for creating product
- Opening Stock - If your store has some previous quantity than you can add it here
- Quantity Alert - After this quantity if your stock less then it will show out of stock.
- Besides these you can enter name, slug, category, brand, purchase, sales, Mrp, custom fields.
Sales
When you want to add new sale. You can do it from Sales → Sales menu. You can filter sales by party, invoice number, dates. Also, you can get paid and unpaid sales status automatically when you add some payments to sales. Following action can be performed on sales:
- Get sales by payment status so that you can easily identify your business growth.
- Add sales returns when a party want to return some items
- Add payments to your sales invoice
- Download sales invoice
During Sale creation when you search for the product with Name or Barcode price variants will be displayed as shown below:


Sales Returns
When a sale return by party then you can add it from Sales → Sales Returns menu. After return you can add payment or credit notes. Sales returns status will be automatically generated after adding payments.
During Sale Return creation when you search for the product with Name or Barcode price variants will be displayed as shown below:


Payment In
You can add payment for a party from Sales → Payment In menu. When you add add payment it will automatically detected due invoices for selected party.

When you select the user, it will display all the user related pending invoices list as shown in below screenshot.

Purchases
Add new purchase from Purchases → Purchases menu. Filter puchases by party, dates, invoices number. Add payment from party for purchase and payment status will automatically calculated. Following action can be perfomed on sales :
- Get purchases by payment status so that you can easily identify your business growth.
- Add purchase returns when you want to return items to your supplier.
- Add payments to your purchase invoice
- Download purchases invoice


Purchase Returns
When a sale return by party then you can add it from Purchases → Purchase Returns menu. After return you can add payment or credit notes. Sales returns status will be automatically generated after adding payments.
During Purchase Returns when you search for the product with Name or Barcode price variants will be displayed.
Select the appropriate product from list to continue:

Payment Out
You can add payment for a party from Purchases → Payment Out menu. When you add add payment it will automatically detected due invoices for selected party.
When you select the User, list of pending purchases will be displayed.

Stock Transfer
A stock transfer is the process of moving inventory items from one warehouse, store, or location to another within the same organization. It helps in balancing stock levels, fulfilling internal demands, and optimizing inventory distribution across multiple locations. Stock transfers ensure that the right quantity of products is available where needed, improving operational efficiency and preventing stockouts or overstocking.
During Stock Transfer, search for the product with Name or Barcode, products list will be displayed with different price variants. Select the appropriate product from list to continue:


Stock Transfer records can be tracked based on the payment status.

Stock Adjustment
You can add or reduce stock for your product from Stock Adjustment menu. After adding stock for product it will automatically perform following actions :
- Increase or decrease stock value
- Recalculate stock alert
Follow below steps to add new adjustment:
- Product: product for which you want to make adjustment
- Quantity: quantify by which you want to adjust stock
- Adjustment Type: add or reduce from stock
During Stock Adjustment when you search for the product with Name or Barcode price variants will be displayed.
Select the appropriate product from list to continue:

POS
You can make fast sales using POS page. It provide you more features to add fast sales for your walkin customers. Generate and print POS invoice in one click. In POS page you can add products in one click and generate invoices. You can search product by brand or category. Following steps is to make a POS sale :
- Select a customer
- Add at least one product
- Apply discount, tax, shipping etc.
- Collect payment
- Generate or print POS invoice

When you search by name or barcode:
-
A dropdown list appears showing matching products.
-
Each product is displayed along with:
-
Sale Price
-
MRP (Maximum Retail Price)
-
-
These entries represent price variations of the same product name.
-
Each is treated as a distinct product variant based on pricing. If the product is Same and changes MRP or Sale Price, then a new product will be created with MRP and Sale Price tag attachments. Screenshot attached below:

-
Click on the desired variant (based on Sale Price/MRP).
-
That specific variant will be added to the cart.
-
This ensures billing reflects the correct pricing.
-
If you scan or type a barcode, all matching price variants are listed.
-
This is helpful when:
-
The same barcode is shared by products with different prices.
-
You want to confirm the price before selection.
-
Expenses
Add your business expenses from Expenses → Expenses page. You can create expenses category to organize your expenses. Filter your expenses by customer. So that you can find out which staff member making more expenses. For creating expense you have to create following steps :
- First create expense category
- Add expenses using expense category

Cash & Bank
It will show all payment information that from where payment comes. You can get all payments according to date filters. In cash & bank we calculate payments using following methods.
- Cash - if payment mode is cash, then it will come under cash.
- Bank - if payment mode is except cash, then it will come under bank section.

Reports
To get progress of store/shop, reports are very usefull. You can access reports sections using Reports menu. Following Reports are available:
- Payments
- Stock Alerts
- Sales Summary
- Stock Summary
- Rate List
- Products Sales Summary
- Users Reports
- Expense Reports
- Profit & Loss
Payments
You can get all payments reports here according to user or dates. Can Print reports or export to Pdf and Excel formats.

Stock Alert
You can get which product is out of stock from here. you can filter product from which stock alert exceed. Can Print reports or export to Pdf and Excel formats.

Sales Summary
A sales summary provides a concise overview of total sales performance over a specific period based on the Staff Member. Can Print reports or export to Pdf and Excel formats.

Stock Summary
A stock summary gives a quick overview of current inventory levels, including quantities and values of available items. Can Print reports or export to Pdf and Excel formats.

Rate List
A rate list displays the prices of products or services offered by a business. Can Print reports or export to Pdf and Excel formats.

Product Sales Summary
A product sales summary shows the total sales performance of individual products over a specific period. Can Print reports or export to Pdf and Excel formats.

Users
You can get users full reports from here so that it you can easily identify their contribution in your store. Following reports are available under this section:
- Purchase, sales, purchase return, sales returns
- Due Amount, Paid Amount
- Order Payments
Can Print reports or export to Pdf and Excel formats.

Expense Reports
An expense report summarizes and tracks business-related expenditures over a specific period. Can Print reports or export to Pdf and Excel formats.

Profit & Loss
A profit and loss report summarizes a business's revenues, costs, and expenses to show net profit or loss over a specific period. Can Print reports or export to Pdf and Excel formats.

Subscription
A subscription is a recurring agreement where a customer pays at regular intervals (e.g., monthly or yearly) to access a product or service.

We can select any new plan by select change plan button. Previous transactions and offline requests can be viewed.